Tag Archives: Pollination

Nightshift: Pollen Collection

Sarracenia Heavy Veined

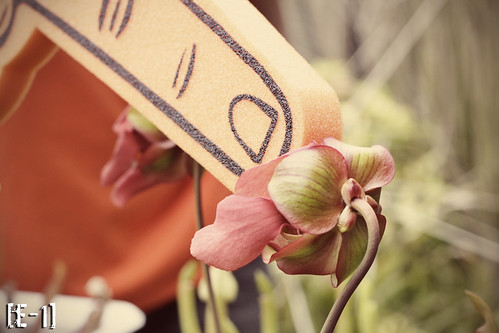
It’s that time of year again! Blooms are forming fast and rising over the mass of last years foliage wreckage! This year promises to be a much better year than last in many aspects. The first two crosses of the season were done yesterday, 5 March 2013, and the crosses were S. (rosea “Big Mama” x flava ornata) x flava “Heavy Veined” and S. (areolata x ‘Dana’s Delight’) x flava “Heavy Veined.” Good stuff! In this post, I wanted to share a few photos of how I collected pollen a few nights ago. (Now that I have the lights set up, my work hours in The Asylum aren’t limited by the daylight.) See, the plants will bloom at different times depending on species or parentage; storing pollen offers up more flexibility and more options become available in possible crosses. I am not sure how long pollen can last, but some have said that if it is stored in the freezer, it can last much longer. I think I heard 6 months but not entirely sure about that. Our subject (photographed above) is S. flava “Heavy Veined.” The plant develops a wonderful deep dark solid interior color underneath the hood with a very nice stocky shape to the pitcher. I hope to use this influence in future crosses. Since nothing else is really in bloom that I want to use it on just yet, I save the pollen just for that purpose.

Sarracenia flava "Heavy Veined" Pollen Collection
HAWT! We dropin’ pollen. Makin’ it rain all up in here…

In past years I’ve used empty paint canisters, or used plastic shot glasses to store pollen. This year I just went down to a local restaurant supply store and picked up those little containers they use for condiments for pollen storage use. Now keep in mind, many others have various different ways and styles of collecting and storing pollen. I’m simply sharing what I do that works for me.

Sarracenia flava "Heavy Veined" Pollen CollectionSexy! Sexy pollen!

I wait for the pollen to drop into the style (see illustration of flower parts in this post) to harvest it. I try to do this as early as possible to ensure fresh pollen collection. Also, right before collecting, I’ll also give it light tap on top of the flower to encourage more pollen to drop out of the anthers. Next, I will carefully tilt the flower, then gently give it a light gentle shake so that the pollen slides into the container. One can even tilt the entire pot with the plant to minimize flower aggravation. Again, it’s important to do this early enough when pollen freshly drops and it makes it easier to slide the pollen out of there between the stigmas. I find it easier to do this with the larger flowers that have the stigmas located higher up away from the pollen. If you’re careful enough not to get any pollen on the stigmas, the flower can also be used as a pollen recipient. If you are only after the pollen of said plant, you can just freakin’ chop the entire flower off, rip that style off, dump the pollen in a container, then discard flower in compost. Alternatively, you can cut the flower off at the base, stick in a small vase of water, then place the entire thing in the fridge. I know others who do this too. Again, lots of different ways to do this.

Sarracenia flava "Heavy Veined" Pollen CollectionLabel yo’ stuff.

Next – and very importantly, LABEL the container! I took a fine sharpie and wrote it on the lid AND on the side of the container to make sure there’s no mix up. Finally, I put the container in the fridge to store. I didn’t get a photo of it, but finally got a fridge for the greenhouse!! YEAH! (Thanks again Dez n’ June!) In the past I’ve gotten use out of the pollen for about a month or two. I don’t know to what extent the pollen can be stored and still be viable as I’ve never had to really go outside of 1-2 months for crosses. Hope that you found this post helpful! Looking forward to seeing what this year will bring and what everyone else will be working on. Now get out there and get crossing!

Cheers everyone!

Pollination: Tools

Hope everyone is having a great weekend thus far! Let’s talk a little bit about sex today. Plant sex. Pollination! For those of you who didn’t see it in an earlier post, be sure to review Brooks Garcias pollination guide.

I love hybridizing Sarracenias. It’s this whole creative process that I find so enjoyable. See, ya got this one plant you really like, and want to combine characteristics from another plant ya really like — then you cross ’em and hope that the babies will have that combined characteristics from both parents for a bomb ass plant you’ll really jockin’.  I am even working on quite a few hybrids that will take several generations to come to fruition. Me gots these crazy plant ideas that will take several crosses to create through the years. It’s all a creative genetic gamble, but that’s something that I find so fascinating about this process.

Just for easy digestion, I’ll break this subject up in several posts, so be sure to check back now and then on updates on this topic. Today, we’ll talk about some tools used to pollinate.  For Sarracenia pollination, the goal is to get the pollen onto the stigma. Then ya hope and pray that the pollination takes successfully. The pollen can be from a different plant,  or from its own self. The latter is referred to as “selfing” a plant. Now, keep in mind that everyone has their own way they prefer to do things, and I encourage you to try things on your own. Be creative!

Here’s a few tools that are used to apply pollen to the stigmas.

Pollinate

So, here are just a few tools:
Figure A. Q-tip
Figure B. Paint brush
Figure C. Toothpick
Figure D. Earwax pick

You notice that all these tools are small enough to get into the Sarracenia flower, scoop out, carry, then apply onto the target stigmas. I’ve used all these tools and have been successful. It’s all personal preference as far as what you want to use, and again – use what you feel is most comfortable for you.

That earwax pick (Figure D) is actually the one that I favor most right now. I was at Daiso (this rad Japanese dollar-fiddy store in Daly City, CA) a couple years ago and spotted this thing as I was wandering the aisles. See Figure D-1 below.

Pollinate

Figure D-1  – Ear Pick. Dude, so when I saw this I immediately thought Sarracenia pollination. And check out the packaging:

“For cleaning cleanly and refreshingly the earhole”

HA! I love that!  So, I guess it’s not only great for cleaning cleanly and refreshingly the earhole, but it’s great for your Sarracenia hole too.  The reason I like working with the refreshingly the earhole tool is because I find it’s efficient with pollen – something I’ll write about soon in an upcoming post.

Figure E below shows yet another pollination instrument that works just fine – the finger.  Yes, finger. It’s perfectly acceptable to go finger your flower to pollinate.

Pollinate
Figure E – Finger

Ok, I’m a SF Giant’s fan (baseball team) if you probably haven’t figured out by now.  See — In baseball, there’s pitchers. With Sarracenia, there’s pitchers. Get it — *PITCHER* plant?!?  Bwahahah!  Ok, that was my corny baseball/plant joke for the day…   Uhm yeah…

Anyway, back to Sarracenia…

Using the finger works well on the plants that have the larger flowers (like Sarracenia flava, or Sarracenia leucophylla to name a couple)  because it’s easier to get the finger into the Sarracenia hole.  You then take the pollen that’s on said finger and apply to the target stigmas.

Pollinate
Figure E-1 – Finger pollination in the Sarracenia hole.

Pollinate
Figure E-2 – SF Giants Torture pollination.

Size does matter, and at times, you gotta just shove it in there and hope the successful pollination takes place. For those of you who are familiar with the SF Giant’s baseball “torture” way of the game, Figures E-1 and E-2 is illustrating SF Giant’s Sarracenia pollination torture.  Hey, if it works for the team, then it works for the plant. 😉

So, this concludes todays pychobabble about pollination tools and stuff. Hope this helps and inspires some of you that are looking into getting into Sarracenia breeding. Word up, dudes.

Nerdy Pollen Storage

Hope everyone found Brook Garcia’s pollination tutorial helpful! I sure did!  Again, everyone has their own methods and variations on how to pollinate. My suggestion is — do whatever works best for you! Don’t be afraid to try new things.  Anyway, so in 2009 when I wanted to store the pollen to create crosses with plants that don’t bloom at the same time, I figured I could store pollen in little containers that were available at a local craft store.  I didn’t really want to keep the pollen on a q-tip as I wanted to be able to spread that pollen around to more plants. Saving the pollen in the container would allow me a little bit more control. So being the uber plant nerd I am — I stored the pollen.  Actually, it was fellow grower and friend Jacob Farin who called me a Sarracenia nerd when he saw what I was doing. (OK, yes, I am a Sarracenia nerd. I admit. And I’m PROUD!! YEAH!!)

Yes, that is correct. I stored the pollen.

In little pollen containers.

In a pollen case.

In the pollen storage section of my fridge.

Next to the bacon. You MUST store it next to bacon. If you didn’t know, pollen storage next to bacon actually keeps it viable longer.

(Actually — the fridge keeps the pollen viable longer, not the bacon. But yes, eat bacon. It is good for you.)

You can’t really see it in the photo, but I did tag those cases so I knew what pollen was being used. Good record keeping is key, and organization is a good practice.

When it came time for the pod parent to open up and bloom –  I just simply took my uber-nerdy pollen case and my even more super uber-nerdy pollen brushes and pollinated away!   Here’s a photo from April 2009 of my “Sarracenia Pollen Palette”.

Sarracenia nerdy indeed!
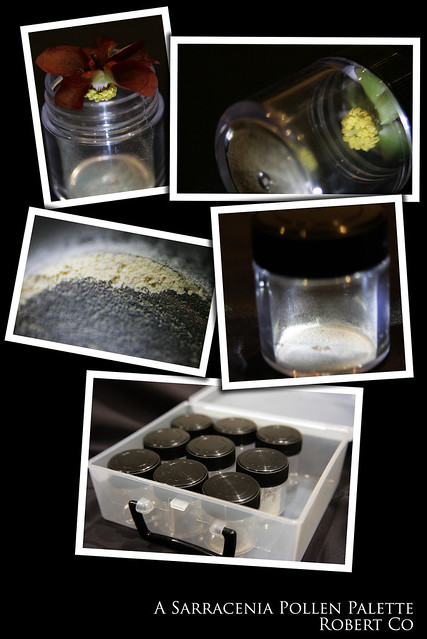
[A Sarracenia Pollen Palette. It’s nerdy. But it works.]