Category Archives: How To

2011: Seeds of Hope

Hope everyone had an awesome New Year! 2011 is now here! YEAH!
2011. Amazing to think  how fast time goes by. Wasn’t it only yesterday that we were worried about that whole Y2K thing?  And, oh yeah! So… uh, where’s my flying DeLorean?

I know it’s been a few days since I’ve posted; already 2011 is shaping up to be chalk full of activities.  The holidays have come and gone. It has been so great to spend time with family and friends (with great food and drink I may add…)  and just time with loved ones makes the season special. It will be back, before you know it.

So what’s in that box that I left back in 2010’s post?


Box. yes. I know it’s a box. Don’t judge a box by the… boxyness. I guess.  What’s on the inside is what counts…

Ohh…the box is now opened and what do we have here?  Envelopes! Not just any envelopes! They be filled with *even MORE* Sarracenia goodness. Filing anyone?  I know I was doing some filing in an earlier post, but here’s even more filing that had to be taken care of after that post. So much fun! I wanted to take you on a Sarracenia seed journey. We’ll be following these babies from envelope packing, germination and… beyond!

Tools I used included things like:

-Paper: It’s whats beneath all that paraphernalia. I’ll be using that paper to catch the seeds that will fall out of the pod.  It’s folded into quarters which will help direct the seeds to wherever they need to go.

Pliers: Great for removing splinters, removing ingrown toenails and other plier-ly things.  Oh, good for opening Sarracenia seed pods when things get too tough to crack.

-Pencil: Organization is key. Use it to label. Ya GOTTA know what you got! Pencils are also are great things to fling into ceilings when one is aggravated.

-Tooth flossy floss thing: gotta keep em pearly whites looking nice. Get that stuff growing in between yo’ teef’.  Great for scraping seeds from the pod too. I got this at some dollar store, but you can find these at random stores here and there.

-Coin Envelopes: For coins.  And seeds.   Both be straight up money, yo. I found these at the Office Depot.

-COFFEE: Very important. I suggest a nice bold French. Why this is important to Sarracenia – who knows. It just helps me focus on the job.

-Bag for waste (pictured below): I used a blue bag cuz it’s the only bag I had. This is for the empty Sarracenia  pod/shells. Keep your work area clean. It’s just nicer that way!

Above is a shot of that Tooth Flossing thing-ma-bobber. As you can see, great for getting the gnarlyness in between your gums. Great for scraping those seeds from the pods too.

So, inside the envelope are the seed pods that I harvested earlier that month. I keep the seeds stored in a cool dry location while still in the pod.  I do label the pod (as you can see) and the envelope as well.  Pictured above is  a nice red tall red moorei that I was crossed with the pollen of S. ‘Adrian Slack’ .

Cracking the pod! Sarracenia seed pods can be tough to open at times. When it’s like this, I take the pliers  and *gently* crack the pod open.

Once open, I can get to the seeds.  Here’s a first glance of the seeds of this cross.   There are MANY seeds in each pod, should the cross take.  Several hundred in there, and each plant contained in each of those seeds can be so different from the next. It’s part of what makes this breeding thing so awesome. Surprises everywhere!!!

Now I use that toothpick/floss/tooth thingmajigbobberish to scrape those seeds out.  There are A LOT of seeds and they can be tucked away in weird crevices. I use the tip to gently scrape the seeds out and onto the paper.

I then fold the paper slightly to get all the seeds together…

… then slide all the seeds into the labeled envelope.

Next, I file the seeds that I collect in a nifty Tupperware thing that I got at the dollar fifty store. (My local Daiso store actually…)

Then after it’s all collected and labeled… I store the seeds in the fridge.  Ok, so this is my secret.  Being that these are CARNIVOROUS plants, I like to get them started in that CARNIVOROUS direction early. I store them in the fridge NEXT TO THE BACON (center cut bacon might I add, but any bacon will do) as BACON is sheer awesomeness embodied in fatness. The seeds get AWESOME through osmosis chillin’ next to the BACON awesomeness.

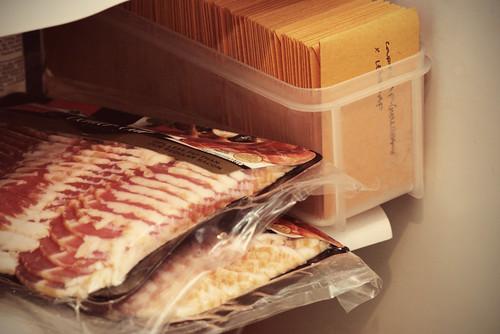
Actually, not sure if the bacon adds anything to this thang — but it’s still pretty rad.

Since I can’t get the seeds into cold damp stratification  right away, this is where they will remain for now for the next couple weeks. Cold stratification will be another post in the near future that I’m looking forward to writing and photographing.

“Hu, cold damp stratification!?” you might say?  Yep – Sarracenia seeds need a period of cold and dampness before the germinate.  Much like our dreams and hopes at times… it may seem dead, but  it’s necessary to get it growing. (Yeah, awesome life parallel there to start 2011 off!)

I do have some high hopes for some of these seeds; so let us see what 2011 brings forth!

Anyway, I hope you all had an awesome New Year and here’s to a great year coming up!  Looking forward to growth both in life and in garden. Cheers!

How to Pollinate a Sarracenia Flower

The following tutorial was written by Brooks Garcia. It is a great reference for pollinating Sarracenia flowers. This guide was what I first ran across (posted on Terraforums) a few years ago when I first started to grow Sarracenia and wanted to get into hybridizing.  I know that everyone has their own preferences, variation, and methods for pollinating, but I found the below to be a clear and concise guide that helped my Sarracenia addiction really bloom. Thanks Brooks!

***

How to Pollinate a Sarracenia Flower
By Brooks Garcia

This is a rather simple procedure but certain precautions need to be taken to insure that: 1) You are successful and 2) You avoid possible contamination from unwanted pollen. Timing is the key here especially if you want to cross species that typically do not bloom at the same time ( i.e. flava x psittacina). With practice and keen observation you will be able to gauge when a flower needs to be protected and when to transfer the pollen.

Necessary Equipment

* Light weight fabric or tulle/bridal veil netting
* Light weight string
* Thin stakes (if needed)
* Q-tips
* Masking tape
* Sharpie permanent marker
* Scissors

Tools You Need
SuppliesNeeded


Flower Structure

We need to discuss the flower structure before hand so you can be familiar with the flower parts and how they function.

Sarracenia in Flower
Photo1

Sarracenias are designed to prevent self pollination by their very structure. The petals are the colorful parts that attract bees and protect the pollen inside the flower from rain and wind. *The anthers produce the pollen and are in the “roof” of the flower and drop pollen onto the style. The style is the upside-down umbrella that has the 5 stigma (female receptors) and catches the pollen. *The stigmas are the ‘hooks’ or slight protrusions on the points of the style which are outside the flower away from the pollen. A bee lands on the sepals (stiff, petal-like structures), crawls down the petals and enters the flower by crossing over the points on the style between the petals thus getting pollen from a previously visited flower on the stigma. The bee gathers the nectar in the flower getting this flower’s pollen on its body and exits the flower through the “dip” in the style and under the petal thus avoiding getting pollen on the stigmas. Look at a flower closely or pull one apart to understand these dynamics.

Flower Parts
800px-Sarracenia_flower_notitles.svg copy
(image courtesy of  http://commons.wikimedia.org/wiki/File:Sarracenia_flower_notitles.svg, author: Noah Elhardt)

Step One: Protecting the Flower

You will need to visit a fabric store and buy a tight-knit, light-weight fabric or tulle/ bridal veil netting. Light weight is very important because you don’t want your flower stalk bending under the weight of wet material after a rain. Staking the flower stalk is an option as well on weak-stemmed species like rubras. The netting will only be needed until the pollen has been set and until shortly after the petals have fallen off. Then the netting can be removed.  This is where keen observation is handy but err on the side of caution and “bag” your flower before the petals have fully opened.  How will you know?  The petals will still be cupped close to the style.  The photo below shows the flower fully open and at this point on this particular flower, the pollen has begun to drop onto the style. It should have been bagged sooner.

Flower Fully Open

The style is the five lobed structure that is the bottom of the flower. This contains the female parts of the flower, 5 stigma in all. On the smaller species (rubras and psittacinas), the flowers are going to be quite small and two people maybe needed to carry this out; a small artist’s paint brush maybe a better tool than a Q-tip for gathering and transferring pollen. Cut a large enough square of netting to cover the flower loosely and be tied with the string. I start at the back of the flower and tuck the fabric between the stem and the back of the sepals. The sepals are the stiff parts that are left after the petals drop. Then wrap the flower loosely and tie it off until you are ready to pollinate the flower.

Bagging Procedure

After each pollination session, secure the netting until the petals have dropped and the flower tilts upward.

Step Two: Collecting Pollen and Cross Pollination

You will need to check the flower every day to see if the pollen has developed and begun to drop onto the style from the anthers. It will look like small pale yellow particles. Pollen will drop for several days up to a week and can be gathered off the anthers if necessary. The anthers, the male parts, are in the top of the flower inside under the petals. Untie the netting and carefully unwrap the flower. Take a Q-tip and very carefully lift a petal.

Lifting Petal to Expose Flower Parts

Through the “dip” in the style, insert the Q-tip and roll it between your fingers to gather the pollen on the cotton. Withdraw it carefully. Take the Q-tip with the pollen to the flower you wish to cross (you have unwrapped this flower as well) hold the stem of the flower and touch the Q-tip to the stigma. *Remember this is protruding between the petals, and roll the Q-tip up the stigma lightly.

Transferring Pollen

Be sure to do all 5 stigmas. Each stigma has a tube in which the pollen will grow down to reach the unfertilized embryonic seeds in the ovary. Each chamber in the ovary is capable of holding 100 seeds. Re-bag each flower and repeat the process the next day for three of four times to insure fertilization takes. A sure sign you have been successful is that the petals drop and the whole flower tilts up and the ovary swells.

Successfully Fertilized Flower Pod

If you want to pollinate a plant that is not in bloom yet, pollen can be saved in the refrigerator on a Q-tip in a plastic bag or wrapped in foil for several weeks until the flower comes into bloom. To “self” a plant, simply take the pollen and apply it to the stigmas. Reportedly, Sarracenias do not “self” very well for some reason but with multiple applications of pollen you should get good seed set. I label the cross by simply wrapping a piece of masking tape on the flower stem with the name of the pollen donor (father). This may have to be replaced once before the seed ripens in the fall. When labeling the plant produced, the pollen receiver is shown first. It is not necessary to wait until the seed capsule breaks open or turns brown to collect the seeds. Seeds are usually fully ripe by mid September.

Now, ain’t plant sex grand!? Good growing!